I currently work with Helm and Kubernetes as a daily task of a DevOps Engineer. In chance, my ex-colleague and also a friend of mine plans to use Helm in his Kubernetes deployment strategy on EKS and AKS. So I write this blog for anyone new to these terms like my friend, who can get the concept and have a rocket start in using Helm.
Introduction

Kubernetes is one of the in-demand technology in the IT field nowadays. With Kubernetes, many problems are solved as ensuring the high availability, optimizing resources, or getting your applications to face millions to billions of requests.
Helm is a package manager of Kubernetes. So what does it mean? In laymen’s terms, Helm is a collection of YAML templates. With these templates, you can easily deploy your application with the right configuration (Service, Service Account, Deployment, Ingress, HPA, etc..) to any Kubernetes clusters.
Step-by-step to create a deployment strategy with Helm
My Github repository for this blog: https://github.com/lecongbang314/base-helm-demo
1. Create the simple web server and its Docker image
In your current working directory, create a folder for the application. In this case, I will create an app folder that will have 2 files:
- simple-webserver.py: Start a webserver listening on port 8888. I use Python and Tornado framework
import tornado.ioloop
import tornado.web

class MainHandler(tornado.web.RequestHandler):
    def get(self):
        self.write("Congrats, your Simple WebServer works successfully!")

def make\_app():
    return tornado.web.Application(\[
        (r"/", MainHandler),
    \])

if \_\_name\_\_ == "\_\_main\_\_":
    app = make\_app()
    app.listen(8888)
    tornado.ioloop.IOLoop.current().start()
- Dockerfile: Package the application to Docker image
FROM python:3.9-slim

RUN pip install tornado

COPY . .

CMD \["python", "simple-webserver.py"\]
Then build and push the Docker image to any registry you want. In my case, I use Docker Hub repository, the build image can be found here.
2. Create the local base-chart
Next, you will create a base chart. So why is it a base chart?
As you may know, Chart is one of the 3 big concepts when it comes to Helm. In Helm quickstart guide, you can easily install Helm and deploy a release with a chart. However, in real case scenarios, the situation is a little bit complex.
For example, in your company, each Kubernetes cluster will have many applications, and you will have to manage many clusters out there. You can not create and manage the helm chart of each application separately. Or if you have many java applications, each of them just has differences in the values of the chart (image’s repository, tag, port,..). Using different helm charts for each application will violate the DRY concept.
In this case, we will define a deployment strategy with Helm. This includes 2 main parts:
- Base chart: Will contain the common thing that shared between application
- Value store: The real value of application when deployed to cluster (single-source-of-truth)
We will start from the working folder, below is a command to create a chart
helm create base-chart
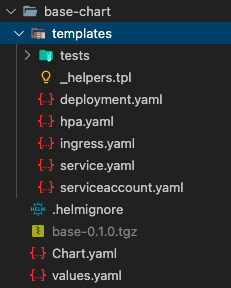
Structure of base-chart

Then the base-chart will be created with the templates ready for you to deploy. I will make some changes to the template so that it can run my application.
Because my application needs to run in port 8888, and in case there will have other applications run in different ports later. I will make the container port a parameter from the value store.
Modify this line in base-chart/templates/deployment.yaml

Now, the base chart is ready to use with the specific container port.
3.Create chart repository on AWS S3
The Chart repository will store all your charts so that you can versioning them and deploy them to the right cluster. I will quickly guide you to create a Helm Chart repository based on AWS document.
Create a bucket on AWS S3. In my example, that is infra-helm-chart. You should have the right aws cli configure before going to the next steps.
Install helm s3 plugin
helm plugin install <https://github.com/hypnoglow/helm-s3.git>
Init the AWS S3 Helm repository
helm s3 init s3://infra-helm-chart
Verify the newly created Helm repository. It worked if you could see a index.yaml file.
aws s3 ls s3://infra-helm-chart
Add the Amazon S3 repository to Helm on your working machine, so that you can use repository alias from now on
helm repo add infra-chart s3://infra-helm-chart
Then, go to your base-chart folder and package it. This will create a tgz file that contains all your templates.
helm package .
Push to Helm repository on S3
helm s3 push ./base-chart-0.1.0.tgz infra-chart
4. Create the value store to deploy to Kubernetes cluster
Create a folder call cluster. This will contain the value that your applications have in run time. You will need to create 2 files:
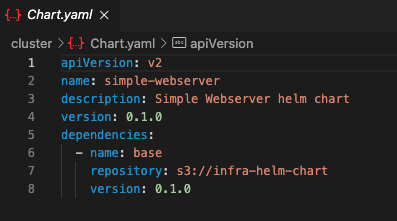
- Chart.yaml: Contain the definition of your chart

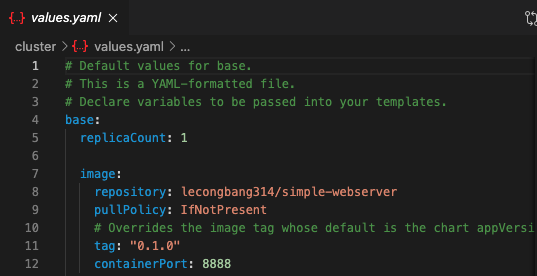
- values.yaml: Contain the value used for your applications

You need to fill in the right value of the image’s repository, containerPort that we modify above, and other changes if needed. Then, we will run the command to pull the chart from the S3 repository (should have the right AWS credentials for this).
helm dependency update
You can use the template command to check if helm generate the right yaml files
helm template .
Then, deploy your application with the updated value file
helm install -f values.yaml simple-webserver .

Check to see if your application is healthy with kubectl command (need to choose the right cluster)
kubectl get pods
Deployed successfully

Then, you can access your application with the right IP or endpoint.
Conclusion
Congrats! If you can come with me till this far, it’s a big thing for me. Cause I’m quite new in terms of writing a blog, I know there are a lot of mistakes out there. I appreciate your time and your willingness to learn new things. If you need me to improve anything or any question, anytime I am here to chat. Just leave a comment and I will reply asap.
Thank you again and take care!